The advanced guide to MRK Media Suite
Put your photos, live guest texts, karaoke queue, adverts, overlays and messages on screen from inside Virtual DJ. This guide covers v4.0.14 on Windows, from install to running a full night.
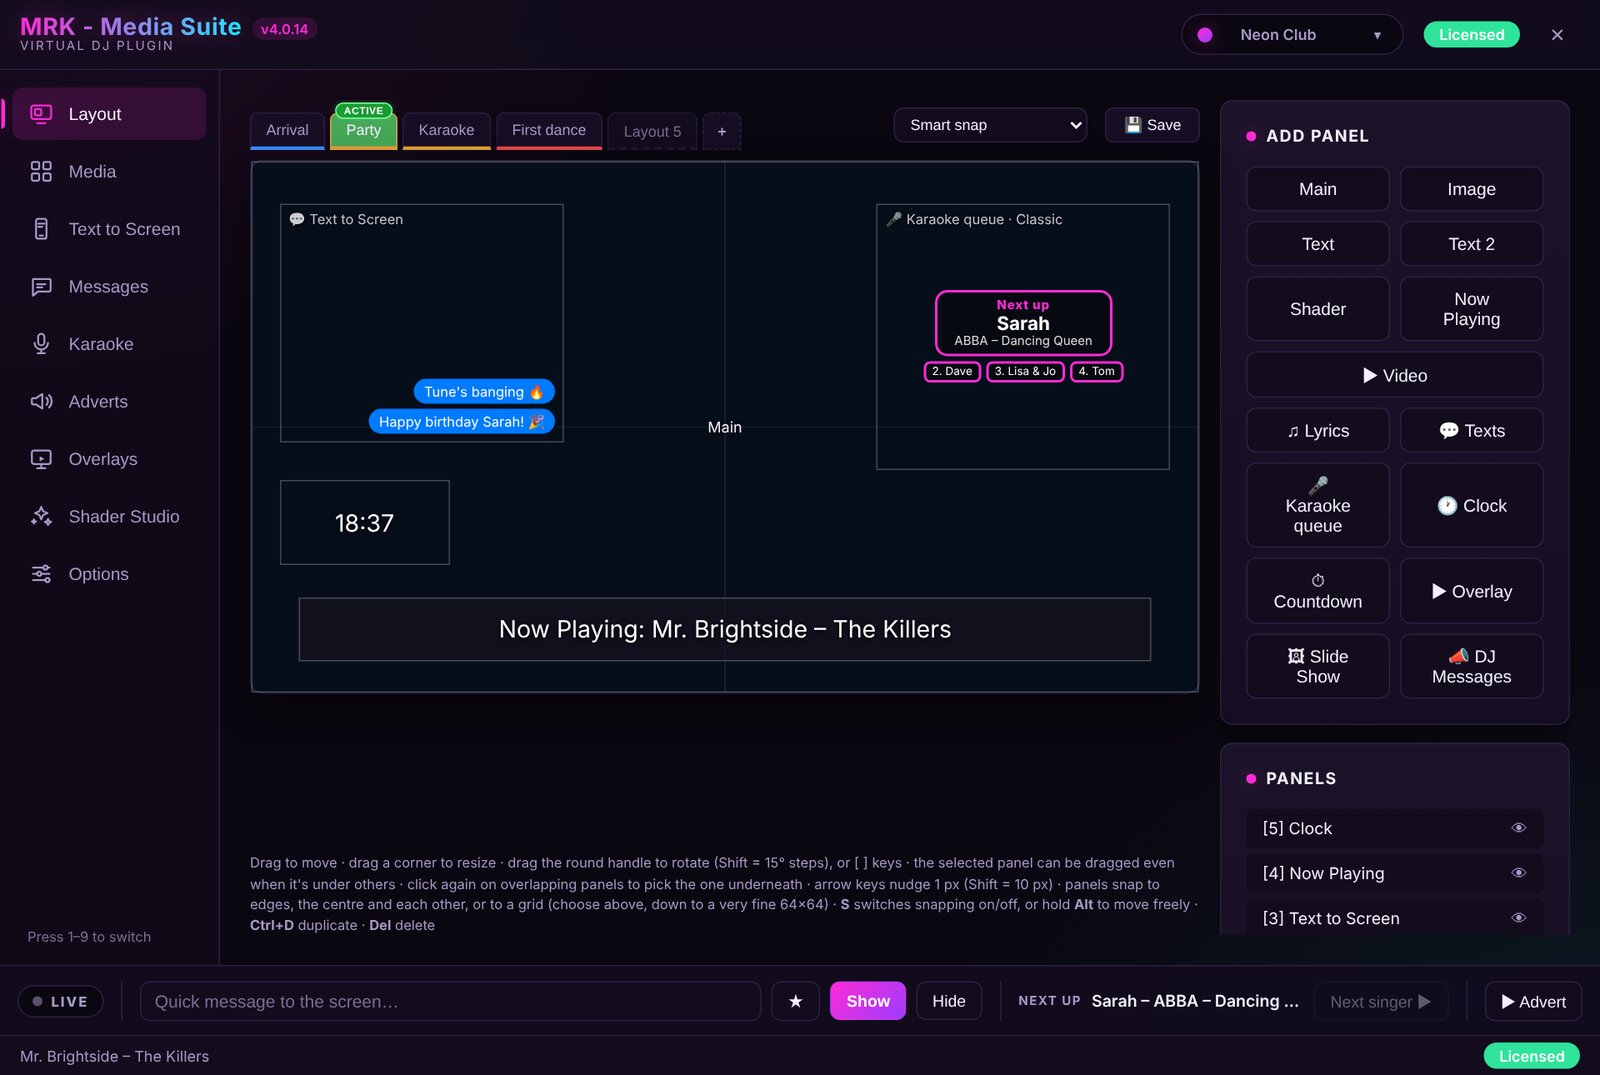
At a glance
Nine pages, one key each. Press 1–9 in the plugin window to jump straight to a page.
Layout
Build the screen from movable panels: deck video, photos, texts, clock, lyrics and more.
2Media
Media Vaults of photos and videos, and the beat-synced slideshow.
3Text to Screen
Guests text your number and it appears on screen.
4Messages
Your own on-screen messages and the midnight countdown.
5Karaoke
The "Next up" singer card and queue.
6Adverts
Your promos, on a timer, over everything.
7Overlays
Rotating party graphics and transparent stings.
8Shader Studio
Describe a visual and get your own animated shader.
9Options
Scaling, shaders, updates and your licence.
How the screen stacks up
Adverts cover everything; your panels sit above the deck video. If something is hidden on the output, check what sits above it.
Adverts
Play over everything below, including messages and the deck video.
Messages and countdown
Above your panels and slideshow, unless placed in a DJ Messages or Countdown panel.
Your layout panels
Texts, karaoke queue, clock, overlays, images… stacked by Layer order (Up / Down).
Main panel
Virtual DJ deck video, or the slideshow. Move it Up to put it in front of panels.
Install and first launch
Setup takes about two minutes. The plugin and its interface always install together.
- Run MRK-MediaSuite-Setup-<version>.exe. If Windows SmartScreen shows "Unknown publisher", click More info → Run anyway. The installer isn't code-signed yet.
- Keep the recommended folder:
%LOCALAPPDATA%\VirtualDJ\Plugins64\VideoEffect. - Tick the optional shader pack for 83 extra Virtual DJ visualisations. The 27 built-in shader effects come with the plugin either way.
- Let it add Microsoft WebView2 if asked. It only does this when your PC doesn't have it.
- Open Virtual DJ, go to the Video effects list, pick MRK - Media Suite Virtual DJ plugin and switch it on.
- Open the plugin window from the effect's settings button.
Important: nothing the plugin draws appears on the video output until you've opened the plugin window once after loading the effect. Your deck video still plays through as normal.
Plugin not showing in the Video effects list? The most common reason is that your Virtual DJ is still using the Documents folder for its files and database, not AppData.
Back in 2017–2018, Virtual DJ kept everything in Documents\VirtualDJ. It later moved to %LOCALAPPDATA%\VirtualDJ (the AppData folder), but only for fresh installs. If your Virtual DJ was first installed back then, it keeps using the Documents folder even after updating, so it never looks in the AppData folder the installer uses by default.
To check: look in Documents\VirtualDJ. If you see database.xml and settings.xml there, that's the folder your Virtual DJ is using.
To fix: run the installer again and change the folder to Documents\VirtualDJ\Plugins64\VideoEffect, then restart Virtual DJ.
Your own files live in Documents\VirtualDJ\Mrk Plugins\Media-Suite (lyrics, shaders, thumbnails, styles). Back this folder up before a big gig.
Getting around the plugin window
Everything sits in one window: pages down the left, the page in the middle, live controls along the bottom.
| Area | What's there |
|---|---|
| Header | Version, theme picker (16 themes, including four light ones for daylight gigs) and your licence badge |
| Left menu | The nine pages. Press 1–9 to switch |
| Bottom live bar | Quick message box with ★ favourites, Show / Hide, the next karaoke singer with Next singer ▶, ▶ Advert, and the track playing now |
Tip: right-click almost everything. Panels, media slots, layout tabs, vaults and the empty canvas all have menus, with shortcut keys shown on the right.
Layouts: building your screen
A layout is the set of panels drawn over your video. Keep up to 32 layout tabs and swap between them live, for example Arrival, Party, Karaoke and First dance.
Step 1Edit one tab while another is live
- The tab with the green ACTIVE badge is what's on screen now.
- Click any other tab to edit it. The screen doesn't change, and your edits save to that tab as you go.
- When it's ready, press Activate <tab name>, or right-click the tab and choose ▶ Activate (put on screen).
Step 2Manage tabs from the right-click menu
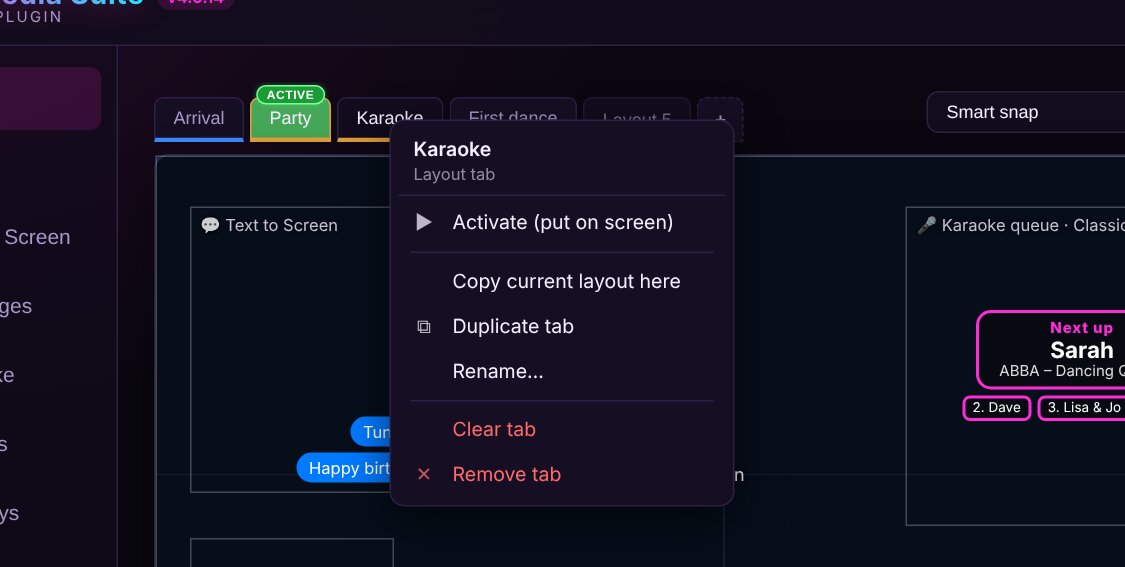
- Duplicate tab makes "<name> copy" and opens it for editing.
- Copy current layout here overwrites the tab with what you have open (it asks first).
- Rename…, Clear tab (removes every panel, keeps the tab) and Remove tab. You can't remove the live tab or the last tab.
Step 3Add panels
Press a button under Add Panel. There are 15 panel types:
Step 4Place panels precisely
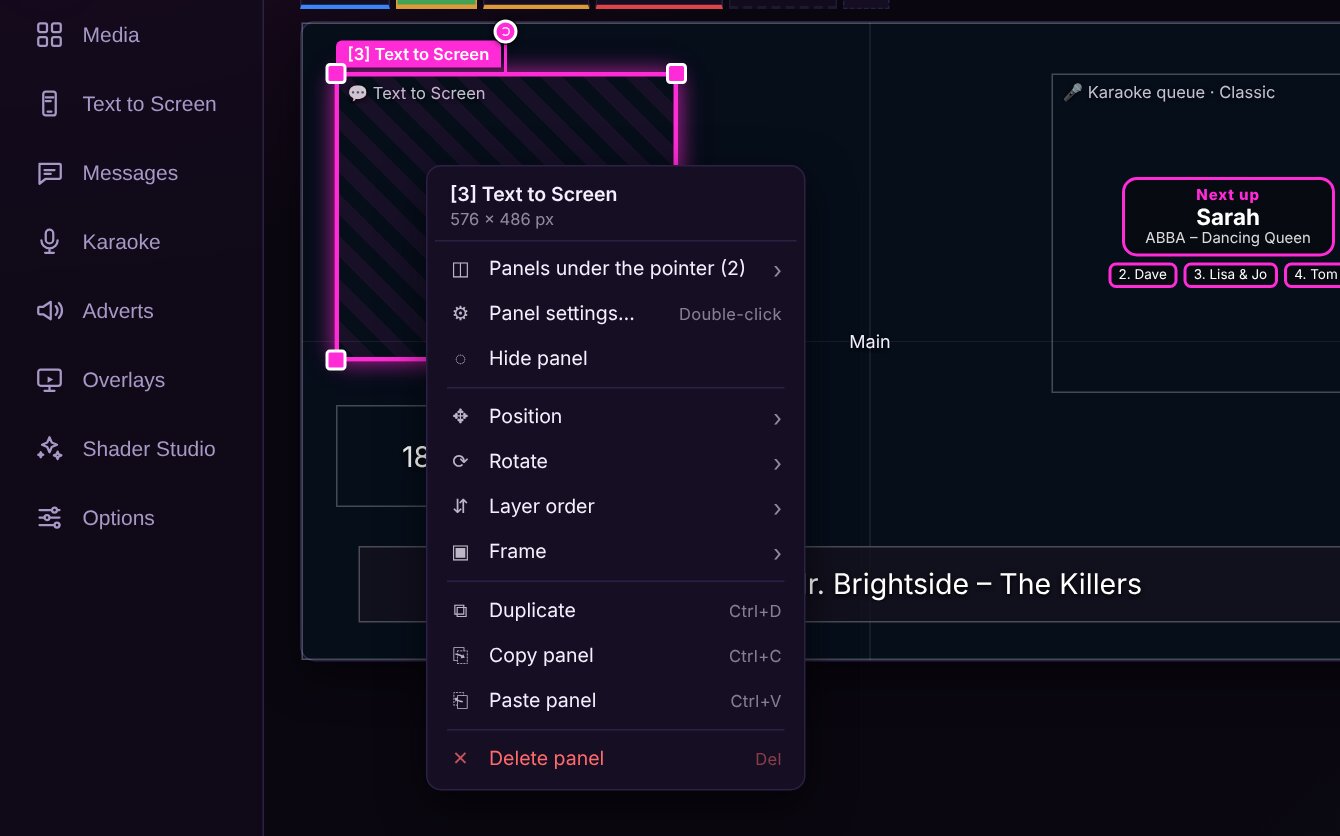
- Drag to move, drag a corner to resize, drag the round handle to rotate. Hold Shift for 15° steps, or press [ and ].
- Arrow keys nudge 1 px; Shift + arrows nudge 10 px.
- Pick snapping from the menu above the canvas (guides, or a grid up to 64×64). S turns snapping on and off; hold Alt to move freely.
- Panels on top of each other: click again to pick the one underneath, or right-click → Panels under the pointer.
- Right-click → Position for one-click Full screen, Centre, Lower third, Top bar and Corner logo.
- Layer order (▲ Up / ▼ Down) also moves the Main deck video in front of or behind other panels.
- Ctrl+D duplicates, Ctrl+C / Ctrl+V copy and paste (also between tabs), Del deletes.
- Press 💾 Save when you're happy.
Panel settings in depth
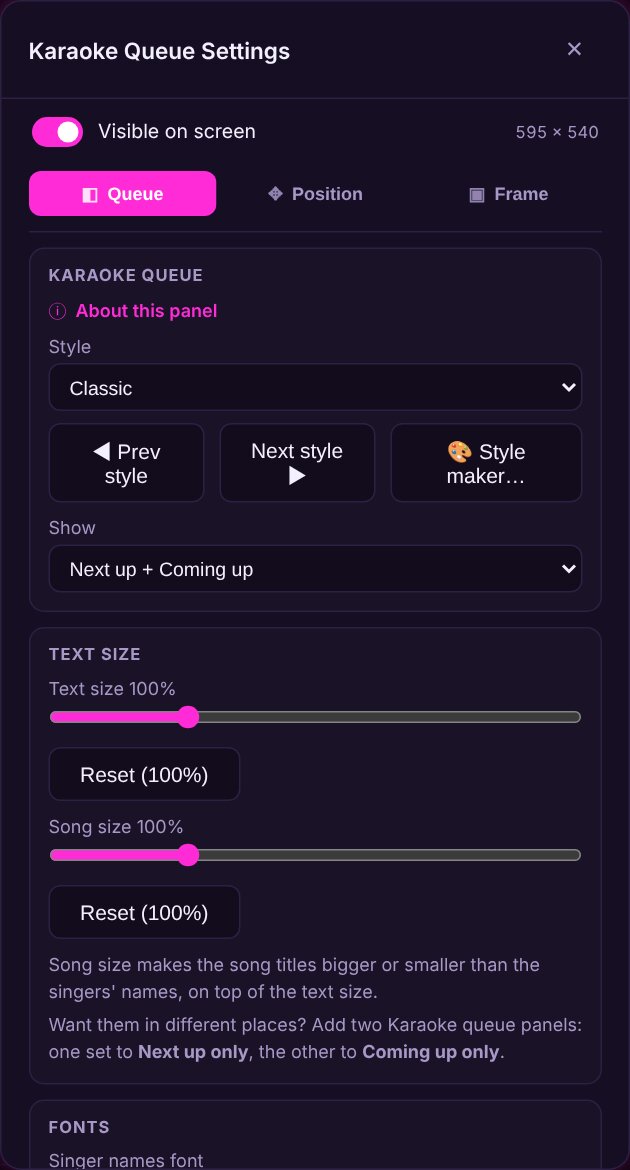
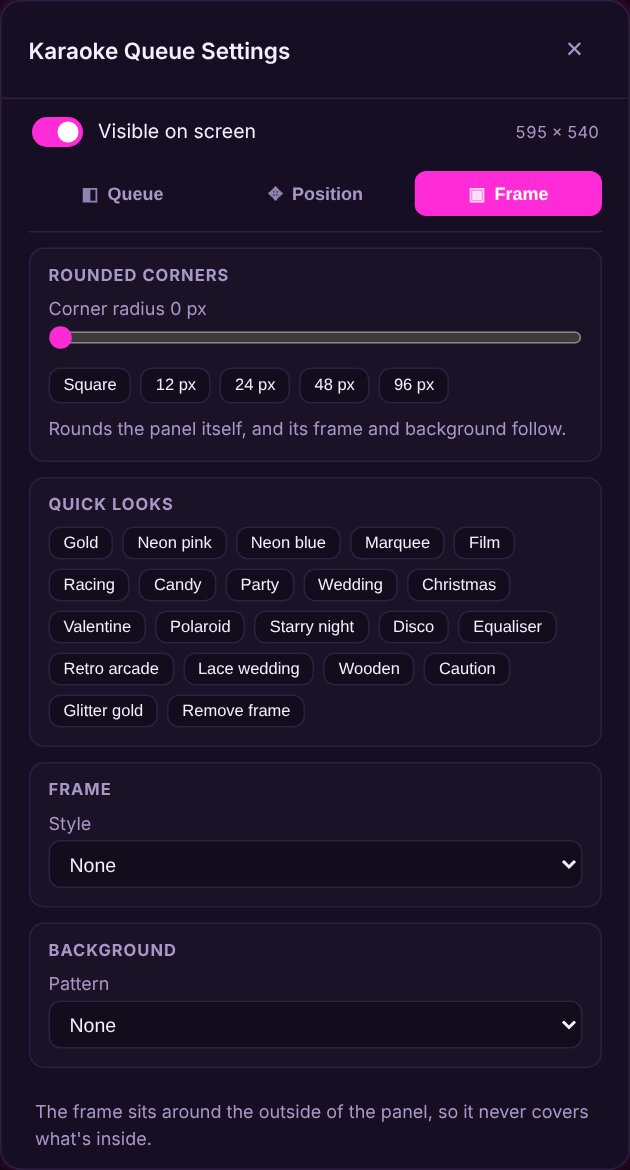
Double-click a panel, or select it and press Edit Panel…. The Visible switch and size sit at the top; below are tabs for Content (named after the panel, such as Queue, Video or Lyrics), Text style on text panels, Position and Frame.
FramesFrames and backgrounds
- Open the Frame tab and click a Quick look: Gold, Neon, Marquee, Film, Wedding, Christmas, Polaroid, Disco, Equaliser and more.
- Or build your own from 27 frames (Neon glow, Marquee lights, Rainbow, Equaliser bars that move to the beat…) and 21 backgrounds (gradients, polka dots, bokeh, tartan, sunburst…).
- Fine-tune thickness, two colours, rounded corners, pattern size, opacity and animation (pulse to the beat, or colour cycle).
Frames sit outside the panel so they never cover what's in it, and they turn with rotated panels.
KeyChroma key (Video and Shader panels)
Remove green, black, blue or white, Remove a colour (any colour you pick), or use Soft brightness key. Each panel has its own Tolerance, Edge softness and Remove colour spill.
Tip: for clean logos and stings, use .mov files with a transparent background. PNG-codec .mov keeps the transparency; ProRes 4444 may not play.
LyricsLyrics panel
Lyrics follow the master deck. The plugin checks, in order: Virtual DJ's own lyrics, a .lrc file next to the song, lyrics inside the MP3, then LRCLIB.net online. Press 🔎 Find lyrics… to choose the right ones (your choice always wins), or Turn off for this song. Lyrics hide on karaoke tracks.
ClockClock and Countdown panels
Open the Style menu for a searchable live preview, grouped into Digital, Analog, Text, Retro & Party, Data and Compact. Clocks show 24h, 24h with seconds or 12h, with an optional date or day name.
Media Vault and the slideshow
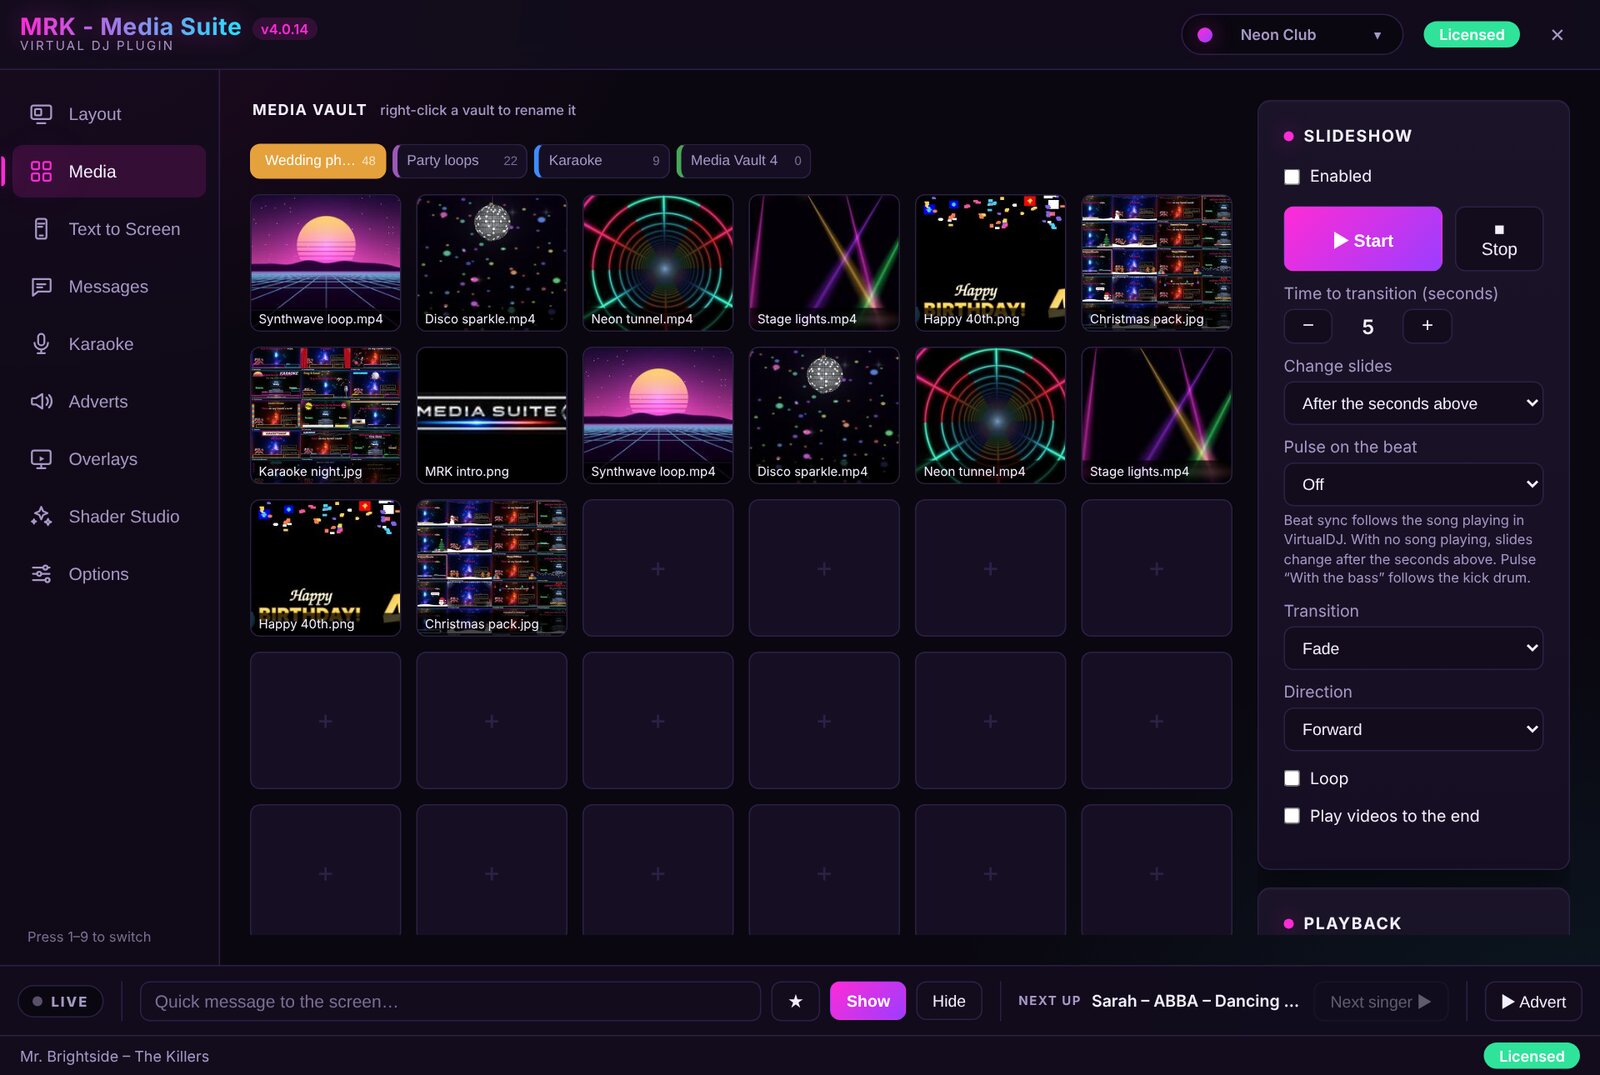
Each Media Vault holds up to 200 photos and videos, and the slideshow can change slides on the beat. The free version has 1 vault and 5 slots.
Step 1Load your media
- Open Media and pick a vault from the coloured bar at the top.
- Right-click a vault to rename it or change its colour (e.g. "Wedding photos").
- Right-click an empty slot to load a file, or right-click a filled slot and choose Replace…. Drag slots onto another vault to move them.
Step 2Fine-tune each slide
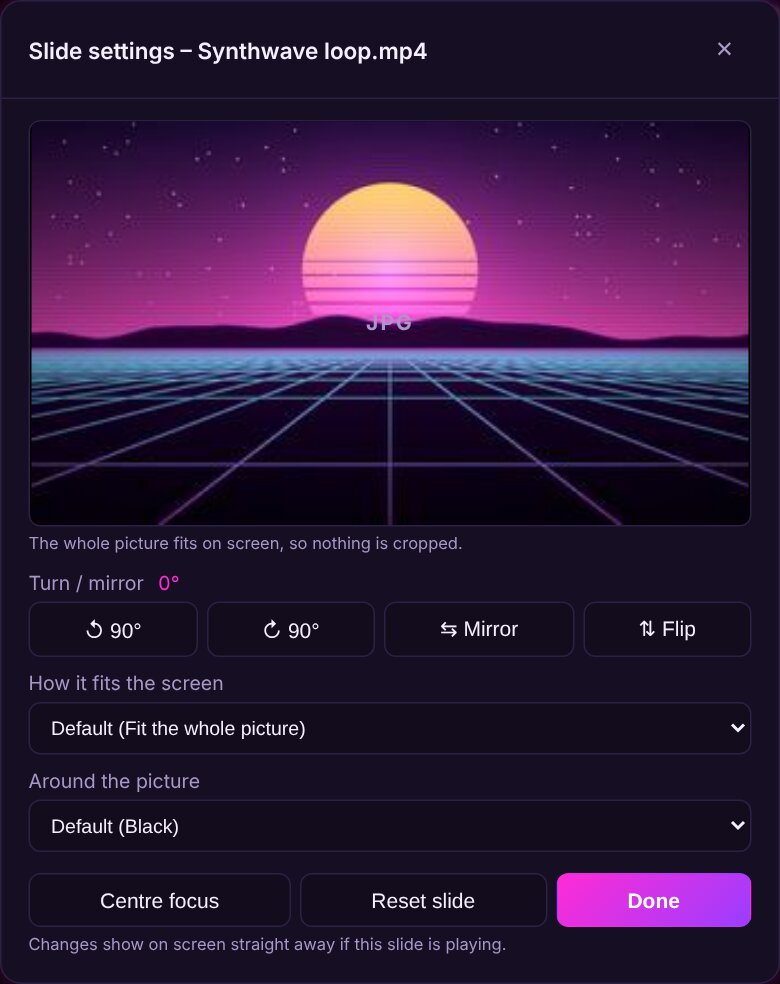
- Turn 90°, Mirror or Flip.
- Choose How it fits the screen and what goes Around the picture (black, a blurred copy, or see-through).
- Click the preview to set a focus point for cropping. Centre focus resets it.
- For green-screen or black-background clips, right-click the slot → Remove green screen or Remove black background, then set the Green / black key strength slider.
Step 3Set the playback
| Setting | Choices |
|---|---|
| Time to transition | Seconds per slide |
| Change slides | By time, every 1, 2, 4, 8, 16 or 32 beats, every bass hit, or With the energy (faster when it's busy, on the drop) |
| Pulse on the beat | Off, Subtle, Strong, With the bass |
| Transition | Cut, Fade, Crossfade |
| Direction | Forward, Backward, Random |
| Extras | Loop, Play videos to the end |
Press ▶ Start. Stop Output clears the screen.
Tip: beat sync follows the song playing in Virtual DJ. With nothing playing, slides change on the seconds setting.
Advanced: add a 🖼 Slide Show panel in Layout to play the slideshow in a framed box, such as a photo wall beside the deck video. With no Slide Show panel it plays full screen in Main.
Text to Screen (Pushbullet)
Guests text your number and their messages, emojis and pictures appear on screen. You decide whether they go up straight away or wait for your OK.
Step 1Connect Pushbullet
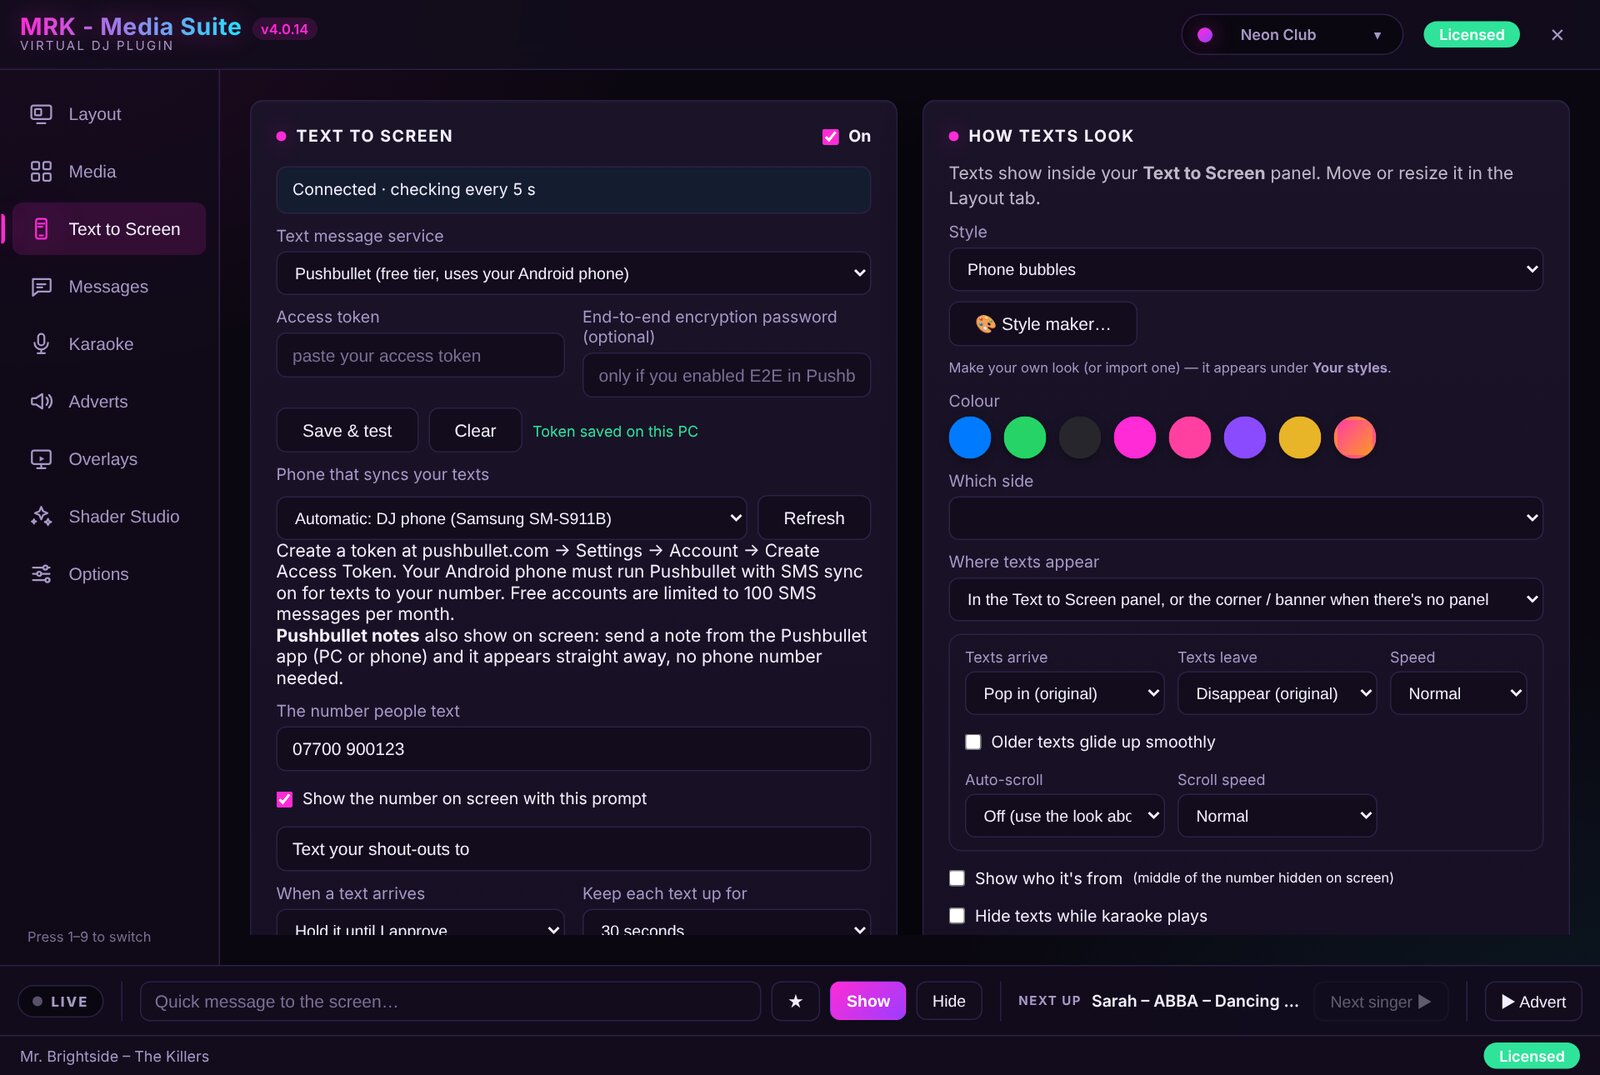
- Install Pushbullet on your Android phone and turn on SMS sync.
- On pushbullet.com go to Settings → Account → Create Access Token.
- In the plugin, open Text to Screen and set the service to Pushbullet. Paste the Access token, plus your end-to-end encryption password if you use one.
- Press Save & test, then pick your phone under Phone that syncs your texts (press Refresh if it's missing).
- Tick On at the top.
Good to know: the token is kept in Windows Credential Manager, never in a settings file. Pushbullet's free plan syncs 100 texts a month.
Step 2Control what reaches the screen
| Setting | Recommended for a wedding |
|---|---|
| The number people text + prompt | Tick Show the number on screen with "Text your shout-outs to" |
| When a text arrives | Hold it until I approve |
| Keep each text up for | 30 seconds |
| Texts on screen at once | 3 |
| When it's quiet, replay texts from | The last 6 hours, one every 15 seconds |
| Don't show texts containing | Your blocked words, comma-separated. End one with * to catch every word starting with it |
| Show who it's from | On (the middle of the number is hidden) |
| Hide texts while karaoke plays | On |
Approve, hide or delete texts from the Texts received list at the bottom of the page.
Step 3Design the look
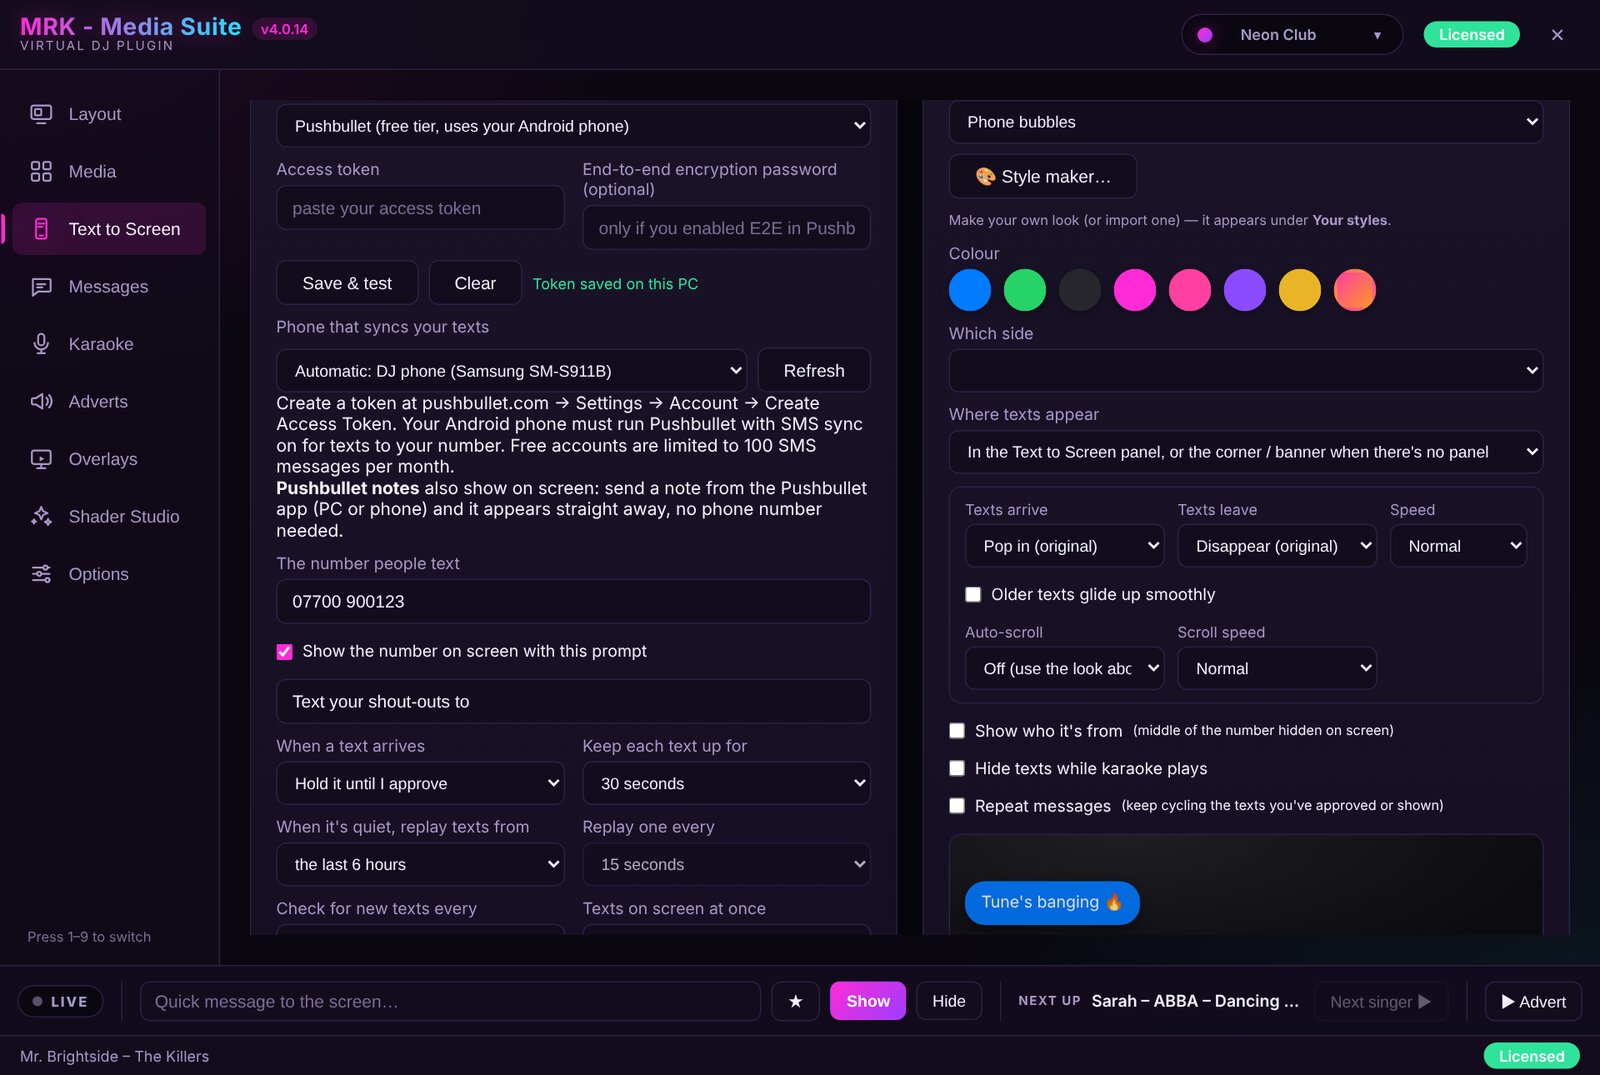
- Style: 50+ looks, from Phone bubbles, Neon glow and Wedding (ivory & gold) to compact List, Wireframe, Glass, Gold and Neon lists, plus anything under Your styles (section 12).
- Colour: iMessage blue, WhatsApp green, dark, your accent, pink, purple, gold or party. Then choose Which side.
- Where texts appear: in a 💬 Texts panel (or a corner/banner when there isn't one), or only in a Texts panel.
- Animations: 17 ways in (including 3D fly-in, swing and slam), 13 ways out, three speeds, and Older texts glide up smoothly.
- Auto-scroll: a News ticker bar, or a Rolling feed.
- In the Texts panel's own settings, set Text size, Prompt size (50–250 %) and font.
Step 4Rehearse with Demo chat
Turn Demo chat on and add up to 20 pretend texts. They go through the word filter and approval like real ones but never touch Pushbullet, so you can try every style on the real screen before the gig. Test on screen sends a single one.
Messages and the countdown
Keep a list of ready-made announcements and put any of them up in one click, plus a countdown to midnight or any time you choose.
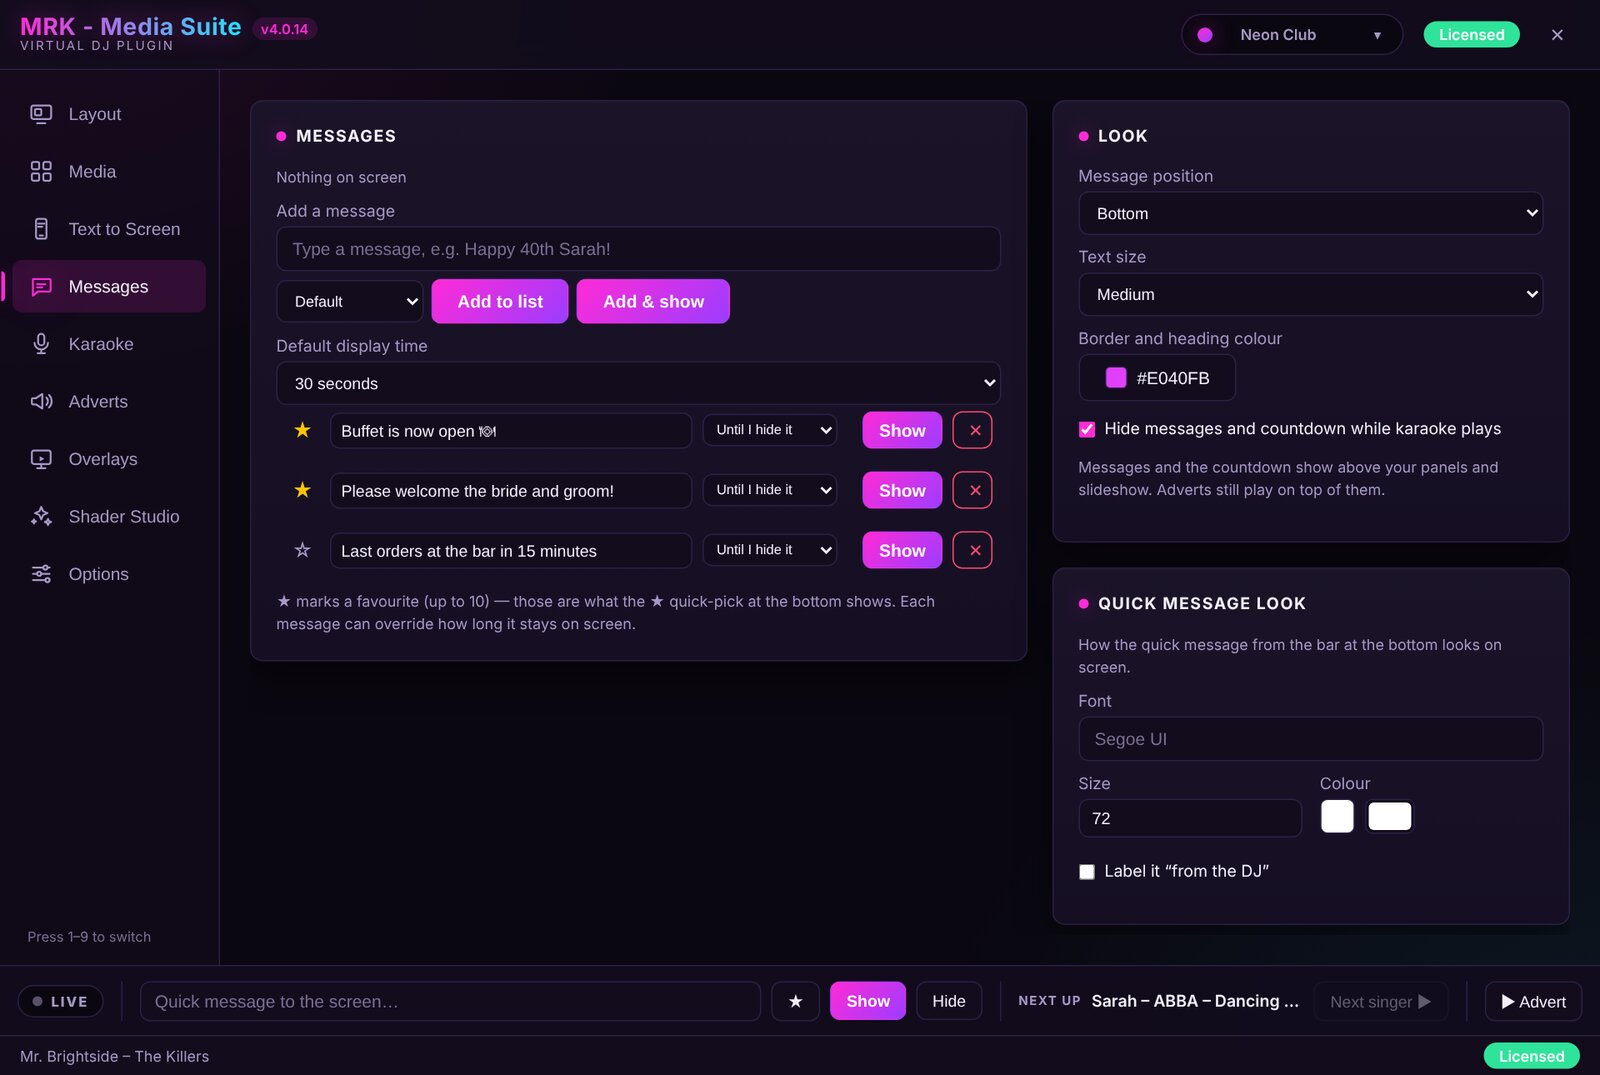
MessagesYour announcements
- Type in Add a message, choose how long it stays up, then press Add to list or Add & show. Enter adds it to the list.
- Star up to 10 as ★ favourites. They appear in the ★ quick-pick on the bottom bar for one-tap use.
- Each message can have its own display time. The status line shows "ON SCREEN · 0:32 left" while it's up.
- Under Look, set the position (Top, Middle, Bottom), size and border colour. Quick message look sets the font, size, colour and an optional "from the DJ" label.
Tip: add a 📣 DJ Messages panel in Layout to put messages exactly where you want them. Without one, the Top / Middle / Bottom position is used.
CountdownCount down to midnight
- Set the Heading (e.g. "Midnight in") and the time to Count down to.
- Set what to show at zero (e.g. "HAPPY NEW YEAR!") and for how long.
- Press ▶ Start countdown. The last 10 seconds show as big numbers.
It counts to the next time the clock reads that time, so 00:00 started at 9 pm means tonight's midnight. Add a ⏱ Countdown panel to use one of 26 styles instead of the full-screen version.
Karaoke queue
Show singers who's up next. The queue can read Virtual DJ's own karaoke list live, so there's nothing to type twice.
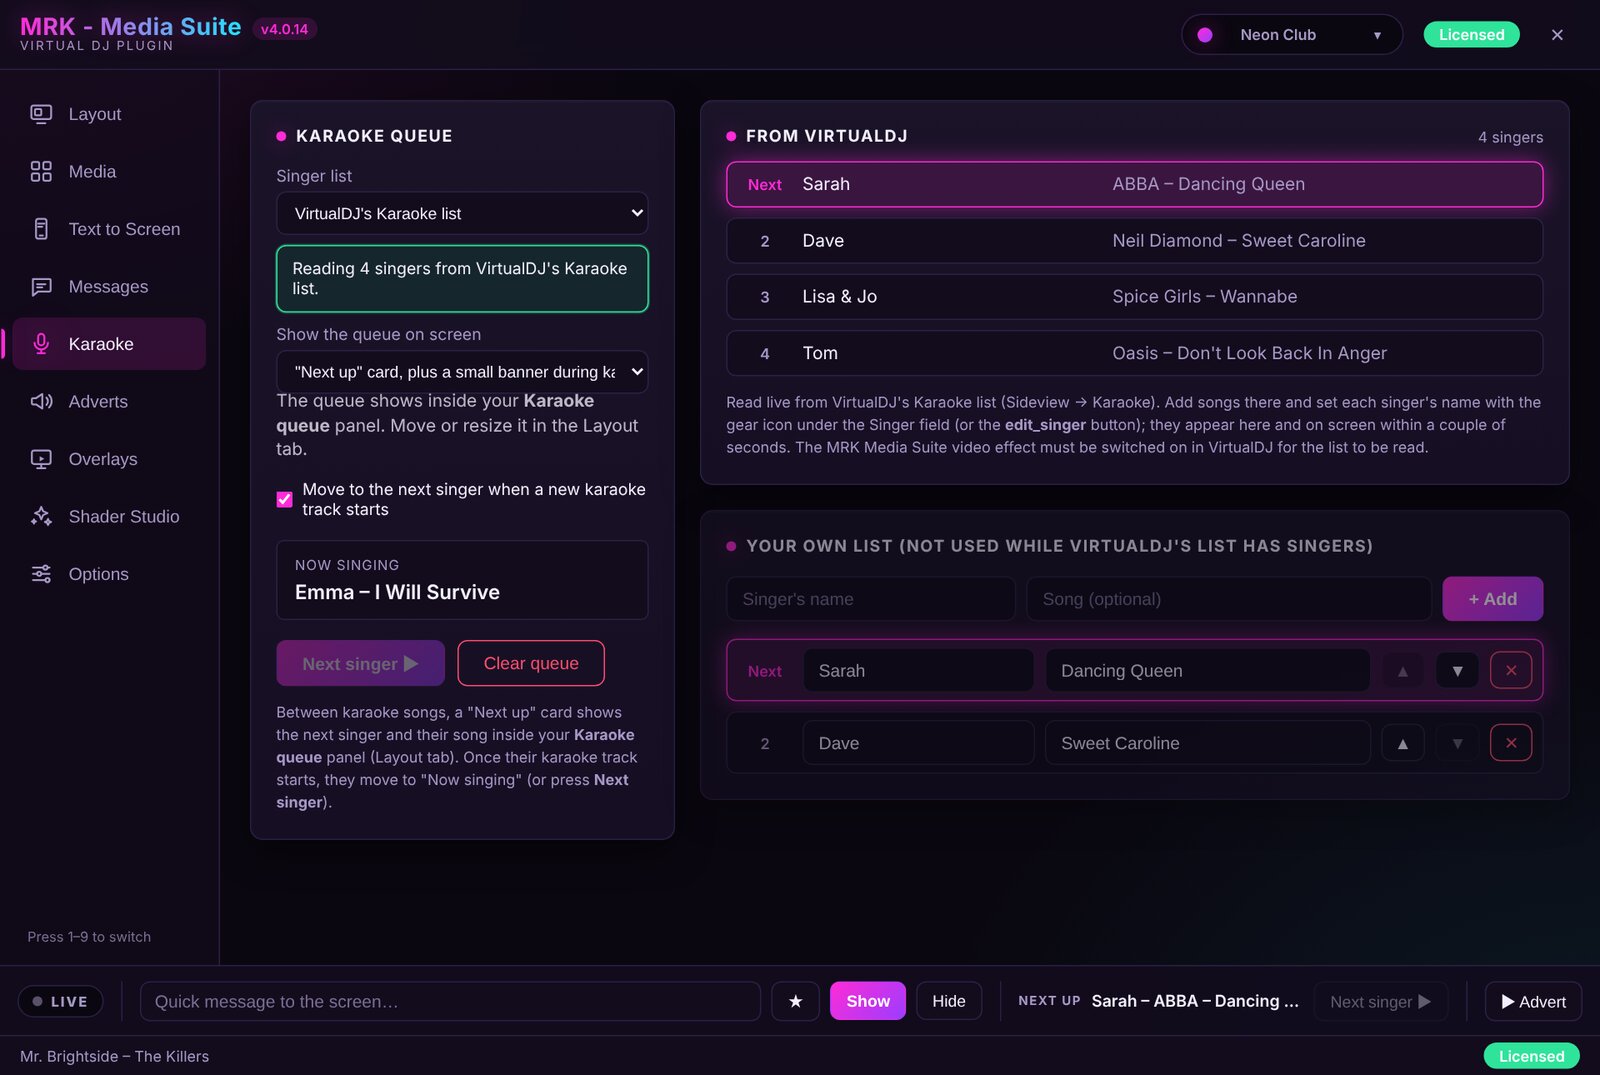
- Singer list: choose VirtualDJ's Karaoke list (Sideview → Karaoke; set each singer's name with the gear icon under the Singer field), or Only MRK Media Suite's own list and add name + song with + Add.
- Show the queue on screen: a "Next up" card between karaoke songs, or the card plus a small banner during karaoke.
- Tick Move to the next singer when a new karaoke track starts for hands-free running, or press Next singer ▶ (also on the bottom bar).
- Add a 🎤 Karaoke queue panel in Layout. In its settings choose a Style, the Text size and font.
- In Options, tick Auto-hide panels/slideshow on karaoke and Disable shaders on karaoke so the lyrics stay readable.
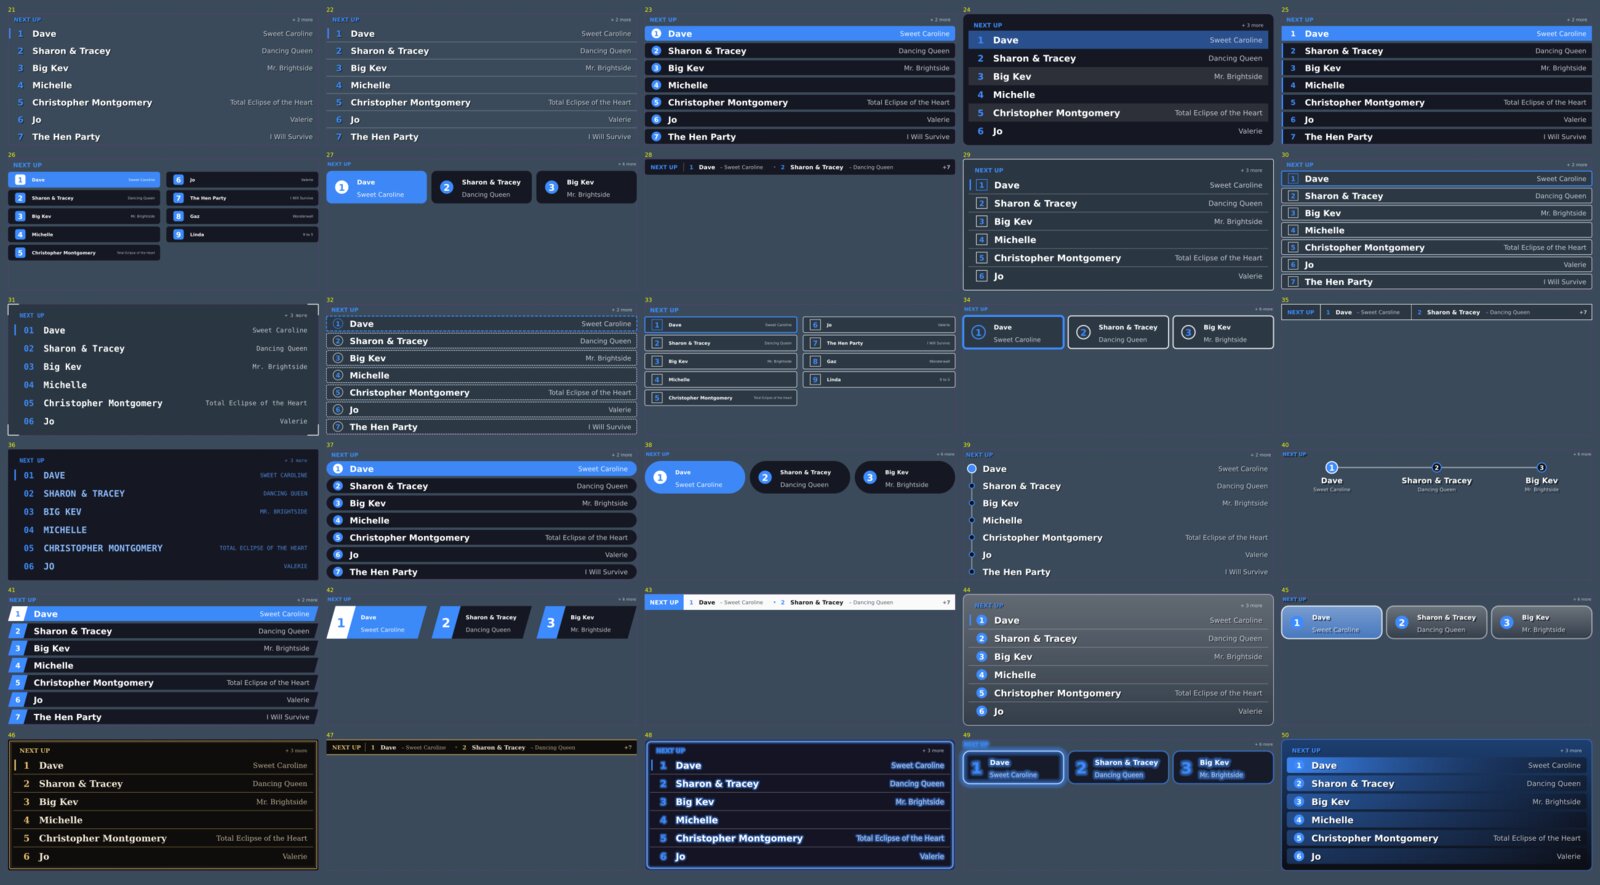
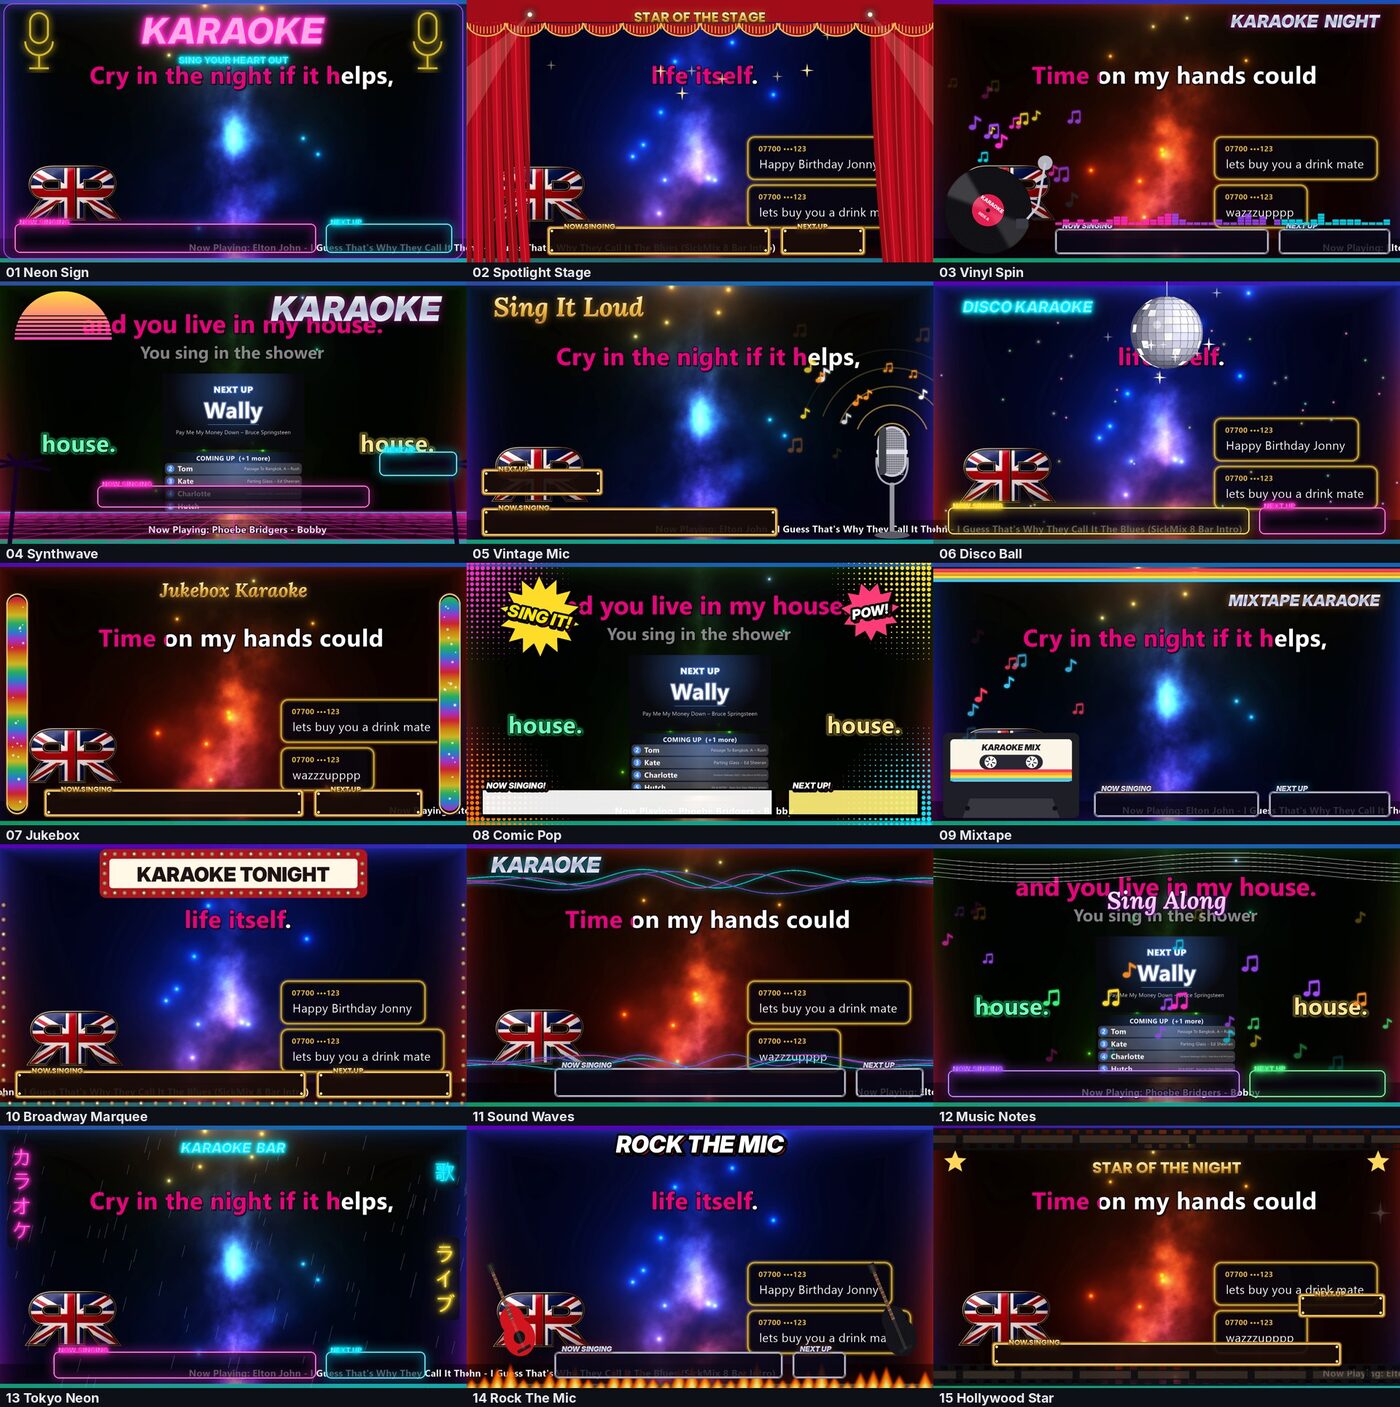
The queue panel has 30 compact list looks, from plain lists to wireframe, glass, neon and gold, plus your own (section 12):
Adverts
Adverts play your promos on a timer, on top of everything else on screen.
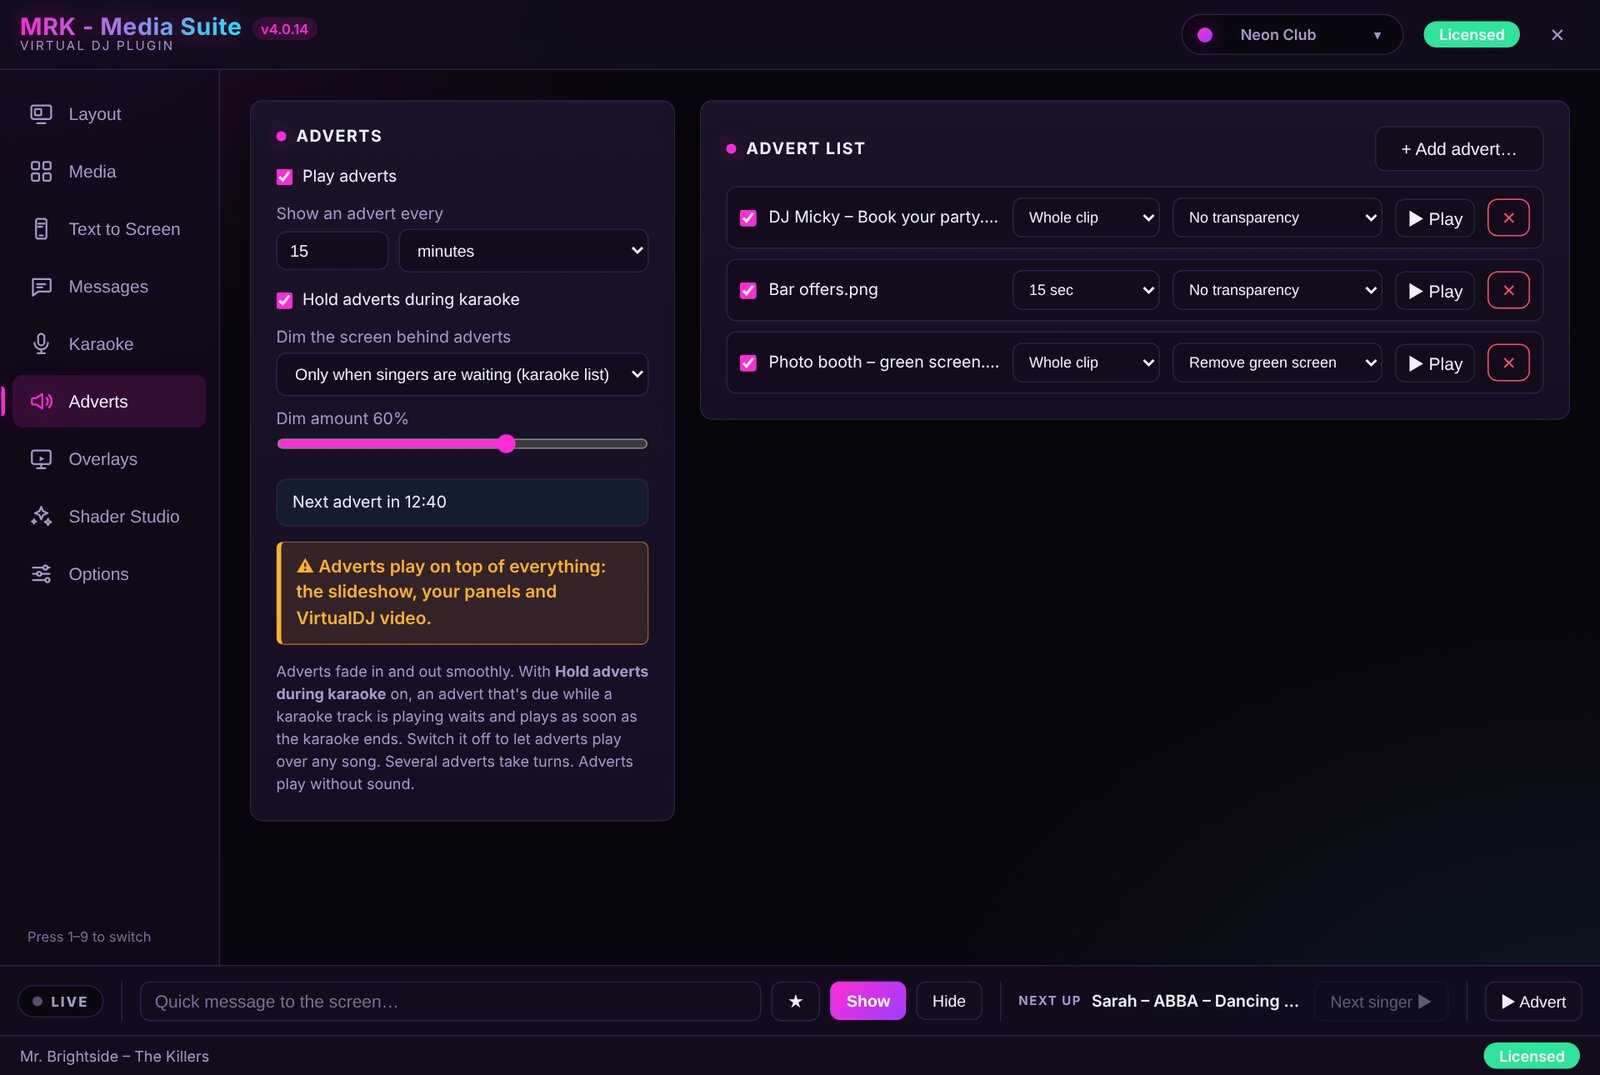
- Press + Add advert… and pick a video or picture. For each one set how long it shows and whether to remove a green screen or black background.
- Set Show an advert every (minutes or seconds) and tick Play adverts.
- Tick Hold adverts during karaoke: an advert that's due waits until the song ends.
- Dim the screen behind adverts: Always, or only when singers are waiting. Set the dim amount.
- To play one right now, press ▶ Advert on the bottom bar, or ▶ Play on its row.
Note: adverts cover the slideshow, your panels, messages and the Virtual DJ video. They play without sound.
Overlays
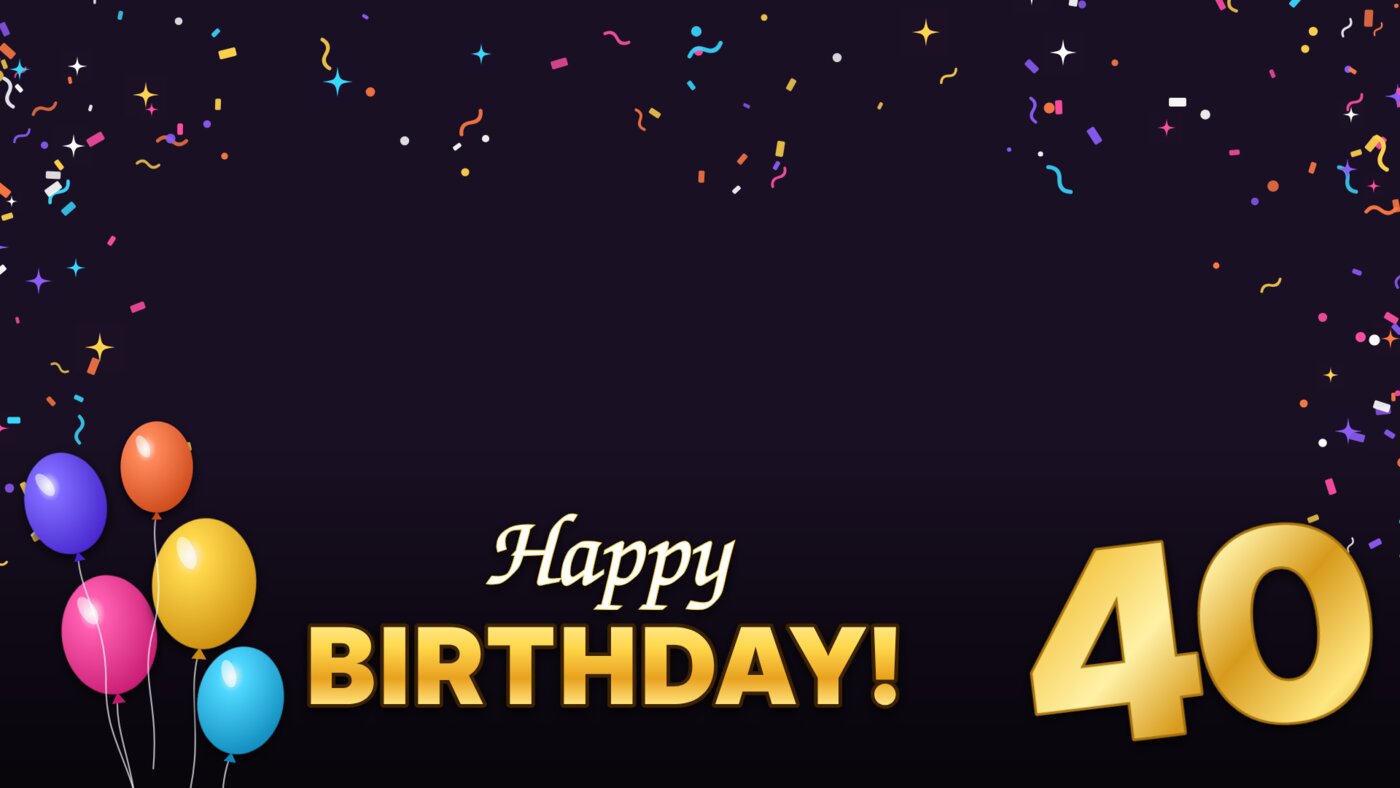
Overlays rotate party graphics, transparent .mov stings and GIFs inside an ▶ Overlay panel. With no Overlay panel in the live layout, nothing plays.
Step 1Build groups
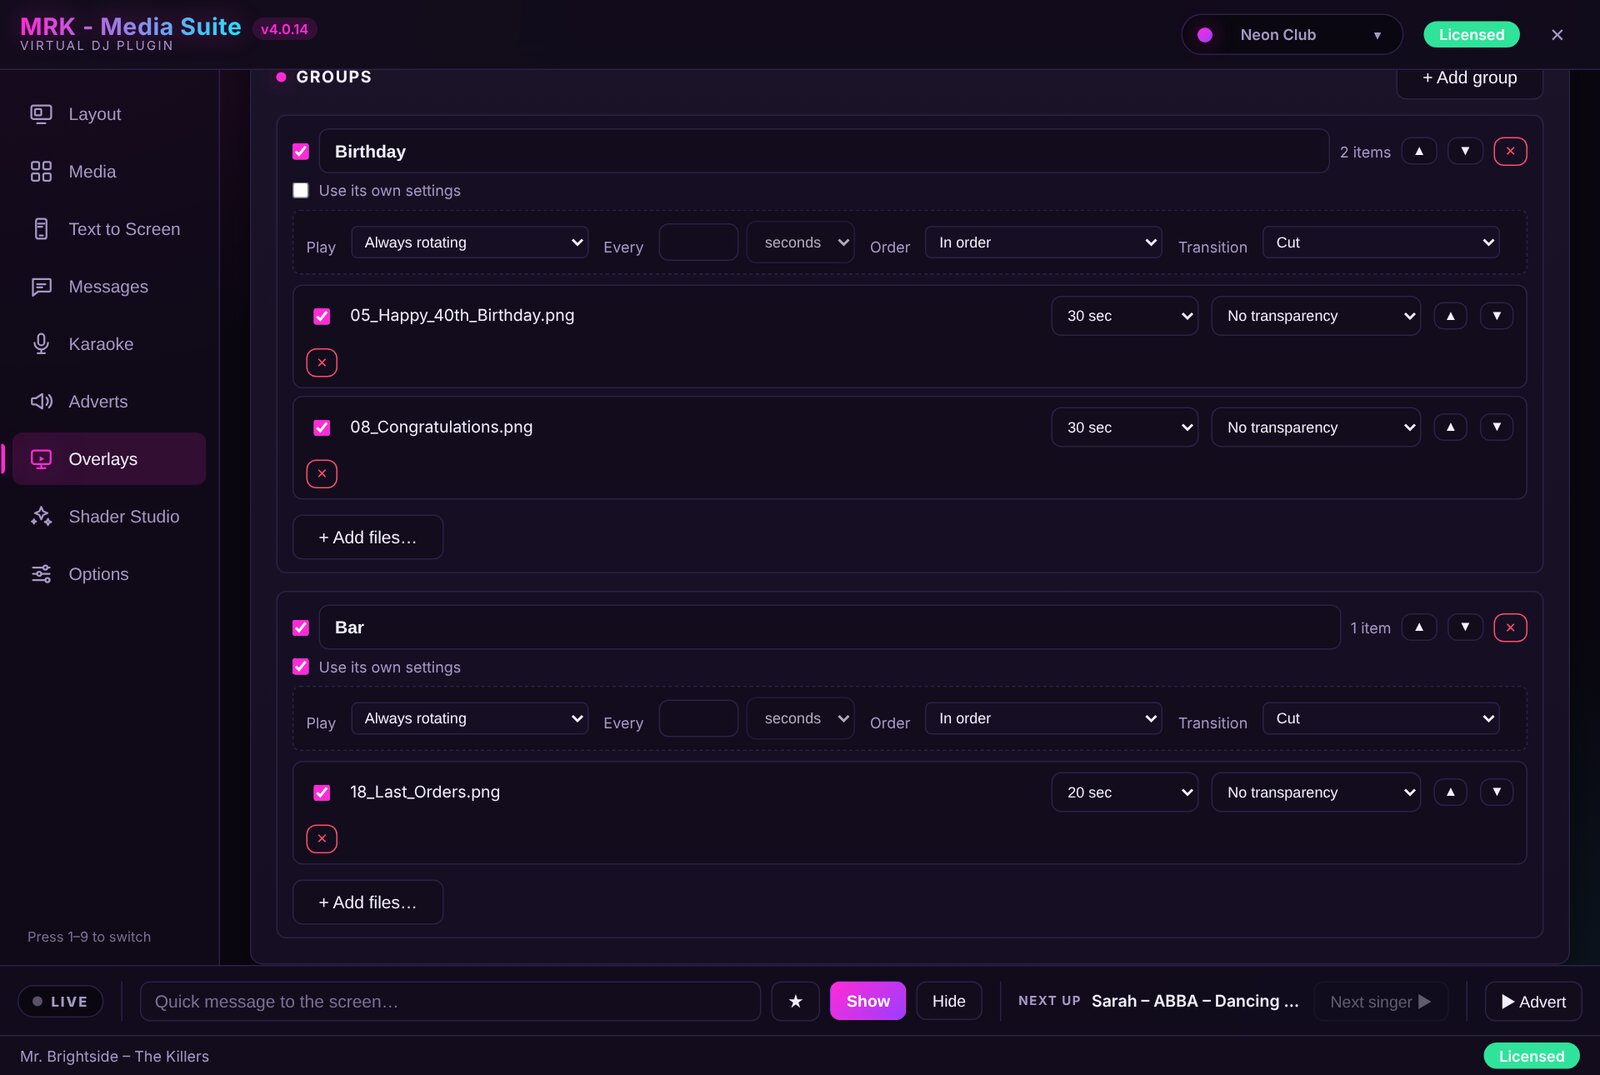
- Press + Add group (up to 10 groups of 20 items) and give it a name, e.g. "Birthday".
- Press + Add files… and pick pictures, videos or GIFs.
- For each item set its show time and transparency, tick it on or off, and use ▲▼ to order it.
- Untick a group to rest it. Tick Use its own settings to give a group its own timing.
Step 2Set the playback
- Play: Always rotating, or Every X minutes. Rotating groups take turns; a timed group cuts in when it's due, then hands back.
- Order inside each group: in order, or Random (no repeat until all played).
- Transition: Cut, Fade or Slide. Tick Hold during karaoke.
- Live controls: Now showing, ⏭ Next and ❚❚ Pause.
Example: a "Birthday" group rotating in a corner panel all night, plus a "Bar" group with Last Orders set to every 20 minutes.
Shader Studio
Describe an animated visual in plain words and Shader Studio writes, compiles and previews it for you.
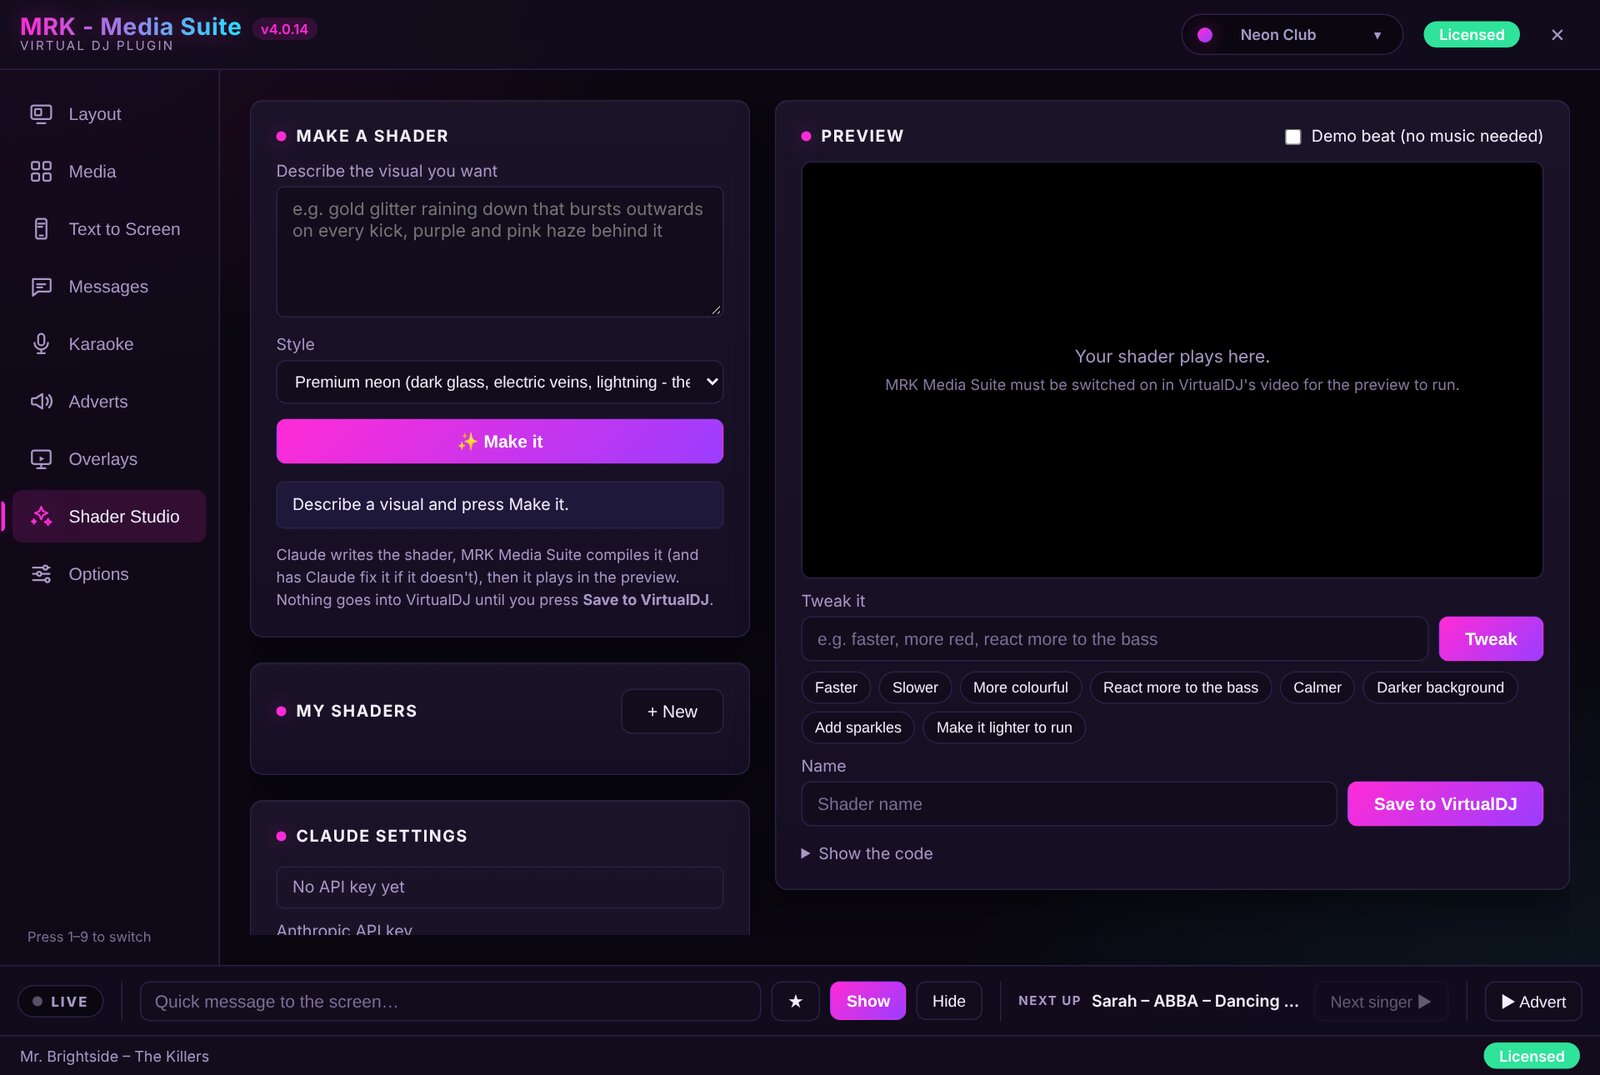
- Under Claude settings, paste an Anthropic API key from console.anthropic.com and press Save. Choose a model; Sonnet is recommended and costs roughly a few pence per shader.
- Describe the visual, e.g. "gold glitter raining down that bursts outwards on every kick". Choose Premium neon or Standard and press ✨ Make it.
- Watch it in Preview. Tick Demo beat if no music is playing. The plugin must be switched on in Virtual DJ's video for the preview to run.
- Refine it with Tweak it or a one-click chip: Faster, Slower, More colourful, React more to the bass, Make it lighter to run… A ⚠ warning appears if it may stutter full screen.
- Name it and press Save to VirtualDJ. It's then available in Shader panels and as the Main shader.
Good to know: your API key is kept in Windows Credential Manager. Track spending under Credits left.
Your own list styles (Style maker)
Make your own look for the Karaoke queue and Text to Screen lists, save it as a small style file, and share it with other DJs.
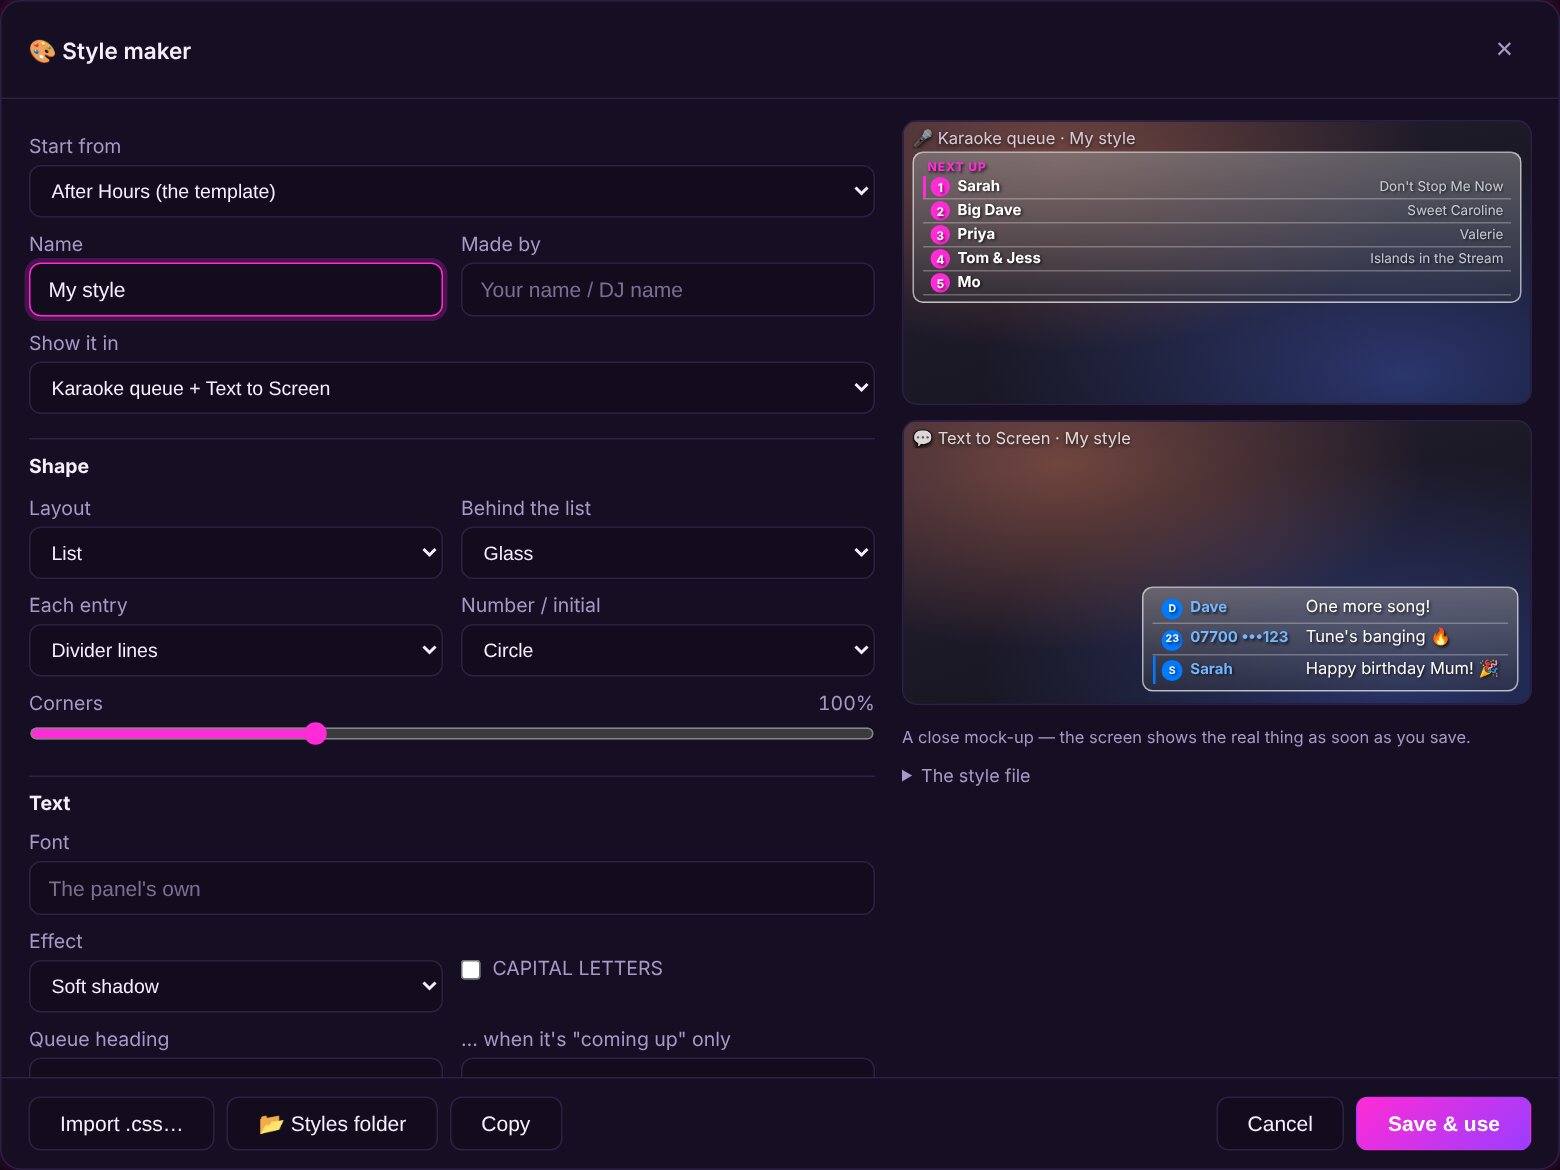
- Press 🎨 Style maker… on the Text to Screen page, or in the Karaoke queue panel's settings.
- Start from the After Hours template, one of your styles, or any built-in list look.
- Set the Layout, Behind the list, Each entry, Number / initial badge and Corners, then the font, effect, CAPITAL LETTERS, the two queue headings and up to ten colours. Untick a colour to follow the panel's colour.
- Choose Show it in: both lists, Karaoke only or Texts only. The mock-ups update as you go.
- Press Save & use.
ShareSharing styles
- Style files live in
Documents\VirtualDJ\Mrk Plugins\Media-Suite\styles. 📂 Styles folder opens it. - Import .css… loads a style someone sent you. Copy copies yours to paste into a message.
- Edit a style file and the screen updates within about 2 seconds, no restart needed.
- MRK Template - After Hours.css in that folder explains every setting.
Note: if a layout uses a style file that's missing on another PC, the list shows Glass list instead.
Options, licence and updates
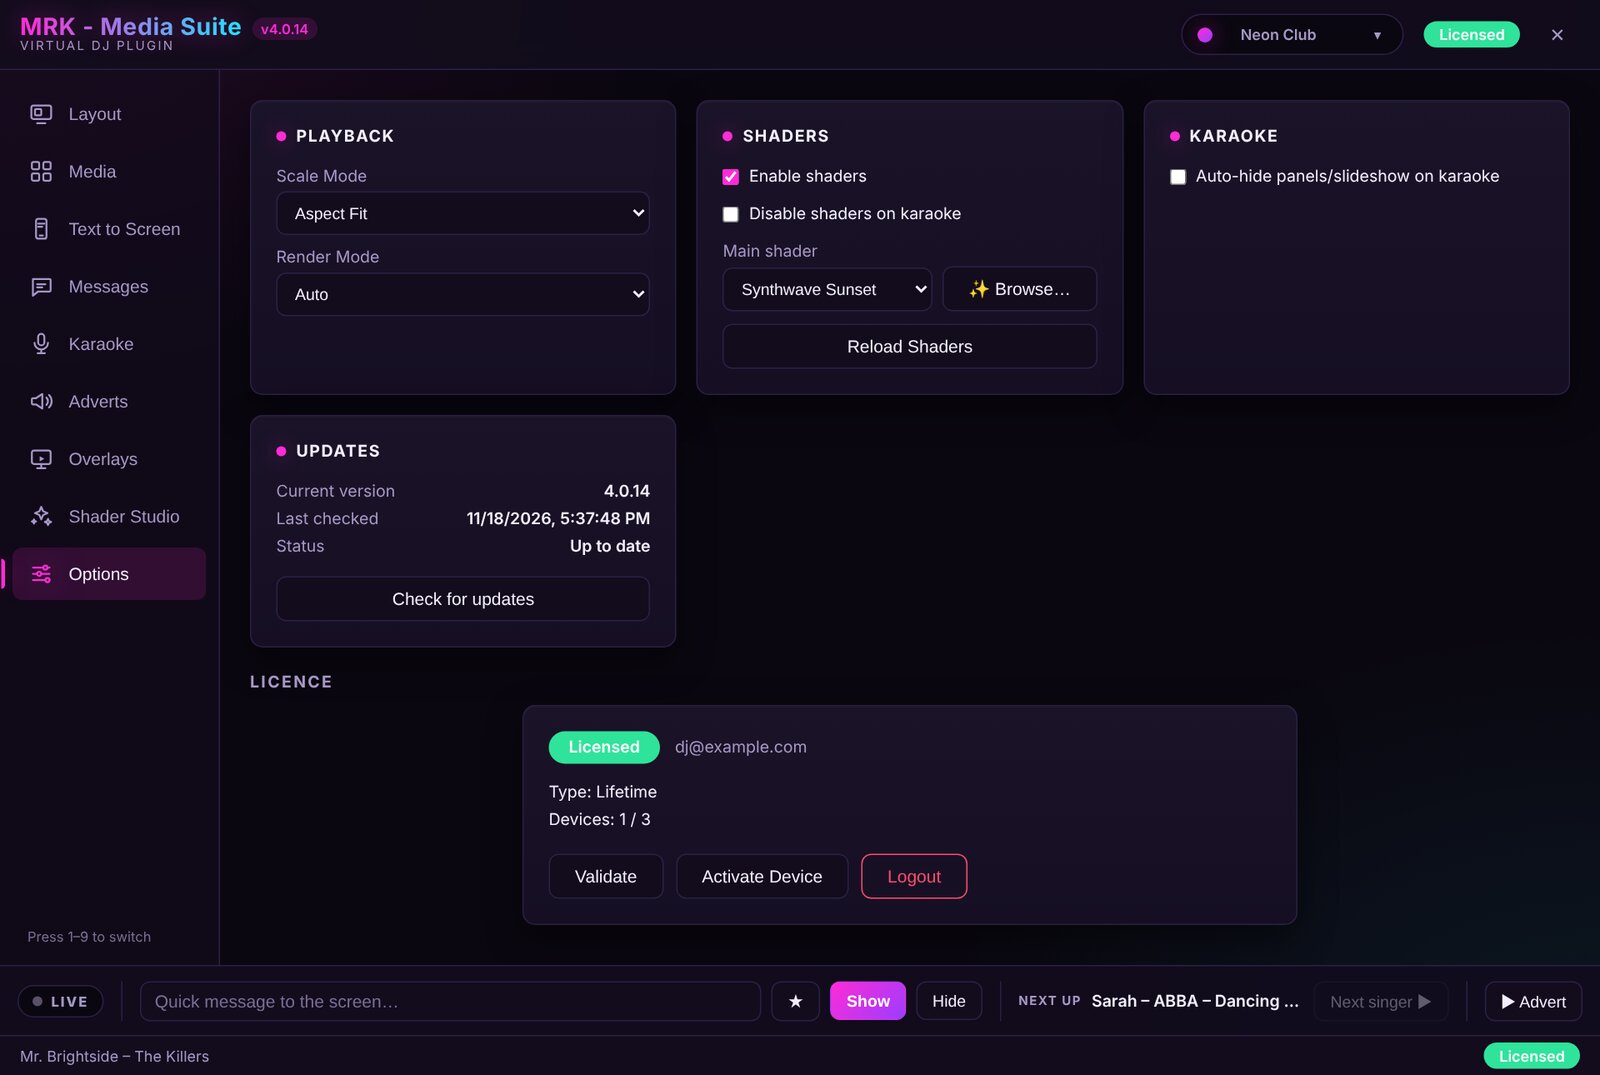
| Card | What to set |
|---|---|
| Playback | Scale Mode (Aspect Fit, Fill, Stretch, No Scale) and Render Mode (Auto, CPU, GPU). Try CPU if a laptop struggles |
| Shaders | Turn shaders on, choose the Main shader with ✨ Browse…, Reload Shaders after adding new ones, Disable shaders on karaoke |
| Karaoke | Auto-hide panels/slideshow on karaoke |
| Updates | Shows your version and last check. Check for updates checks now |
| Licence | Sign in, Activate Device, Validate, Logout |
LicenceActivate your licence
- Under Licence, sign in with the email and password of your account on this site.
- Tick Keep me signed in on this PC, then press Activate Device. The badge turns green: Licensed.
- Moving to a new laptop? Press Logout on the old one first to free the device. You can also see your devices in My licences.
UpdatesStaying up to date
The plugin checks this site shortly after it loads, then once a day. When there's a new version, a banner offers Download from website, Remind me later or Skip this version. Updates are included while your subscription is active, or with a lifetime licence.
Gig-night checklist
A running order for a wedding or party with karaoke. Tick items off as you go; your ticks are remembered in this browser.
SetupAt setup
LiveDuring the night
Shortcuts and troubleshooting
KeysKeyboard shortcuts
| Key | Does |
|---|---|
| 1–9 | Switch page |
| Arrows / Shift + arrows | Nudge the selected panel 1 px / 10 px |
| [ / ] | Rotate the selected panel |
| Shift while rotating | 15° steps |
| S | Snapping on / off |
| Alt (hold) | Move freely, no snapping |
| Ctrl+D | Duplicate panel |
| Ctrl+C / Ctrl+V | Copy / paste panel |
| Del | Delete panel |
| Enter in the message box | Add to list |
HelpTroubleshooting
Still stuck?
Support comes straight from the developer, who uses MRK Media Suite at his own gigs.
VirtualDJ is a trademark of Atomix Productions. MRK Media Suite is an independent third-party product and is not affiliated with, endorsed by, or officially connected to VirtualDJ or Atomix Productions. Screenshots show sample names and messages.